

Some designs are more safe, others more durable, cheaper, or easier and faster to build.
The following design, however, produces a safe, durable, and easy to build sword.
MATERIALS:
˝ inch or ľ inch PVC Pipe – Available at most hardware stores, including ACE Hardware just off the ISU Campus. It costs about $1 for a ten foot piece. Schedule 80 (the gray stuff) is recommended because it is stronger, but Schedule 40 works just as well.
˝ inch closed-cell foam – The most ready source of this are the ground pads used for camping. It is found in the camping section of any Kmart or Walmart for about $9-$10. It usually comes in a roll about 6 feet long and two feet wide. This should be enough foam to build 3-4 swords (depending on the size of the swords).
Duct Tape – Available almost anywhere. We suggest you buy the Professional Grade duct tape (available at ACE Hardware), which is much stronger than the cheaper General-Purpose stuff. A roll will cost about $6, and is enough for dozens of weapons.
Glue – We have found that Liquid Welder works best. It is available at Kmart, Walmart, and ACE Hardware, and cost about $3 for a tube large enough to build at least two weapons. DAP non-flammable contact cement also works very well, but takes much longer to set and cost about $4 for a 16 ounce can.
Cloth and Thread – Any shade of blue, green, gray, red, or yellow can be used, but we suggest dark blue and dark green or blood red. Buy thick, strong cloth that won’t tear easily. We recommend cotton – it’s strong and easy to clean. Cloth can be found at Walmart for between $2-$4 dollars a yard, and about 1/3 of a yard is needed for one sword. Try to buy Button Thread or Upholstery Thread – it is much, much stronger than any other type of thread and costs about $1 for a spool that will make a dozen swords.
Rope – This is to wrap around the handle of the sword for grip and balance. Other materials can be used; leather strips and grip tape are popular choices. Leather strips can be found in the crafts section of Walmart. Long leather shoelaces will work in a pinch. Prices vary depending on what you use.
TOTAL COSTS: $22-25 (enough materials for 3-4 swords)
General Rules on Sword Construction
- All weapons are subject to rejection for any safety or construction discrepancies at the discretion of the weapons checker appointed by the event organizers. .
- A safe weapon is one that will not leave bruises, break bones or noses, or knock out teeth when an unarmored person is struck with a full-strength baseball bat style swing.
- All weapons must have cloth coverings.
- Blue swords have a minimum blade length of 12 inches and a maximum blade length of 36 inches.
- A sword with a blade length greater than 36 inches is considered a red weapon.
- Two and one half inch rule. No surface on a striking edge (sword tip,arrow head, spear head, javelin head, etc) shall pass more than 0.5 inch through a 2.5 inch diameter hole, swords with a semicircular tip, with a minimum 1.5 inch radius are exempt from this rule.
- The flat (non-striking surface) of bladed weapons must be safely padded.
- Single-edged weapons such as sabers and cutlasses must have their non-striking edge clearly marked with a 12-inch piece of silver tape.
- The pommel must not easily go through a two-inch (2.0) diameter hole.
- All bladed weapons must conform to one of the following:
- Minimum dimensions of 1.25 inch by 3 inches.
- Weigh greater than twelve ounces.
- The shaft or blade of a weapon may not flex greater than 45 degrees.
- Weapons cores may not be constructed with baseball bats or axe handles or any other form of pressurized wood.
- Weapons may not have metal cores.
- No weapon may have a spike or blade at the butt (pommel) end, unless it is a legal double-ended blue weapon. This includes double-ended daggers.
- The maximum allowable unpadded handle length for swung weapons is 18 inches.
- All hafts of wood weapons must be taped, including bamboo and ratan.
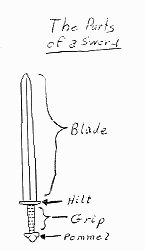
BLADE CONSTRUCTION
- Cut PVC to the correct length. Allow room for the pommel (1˝ inch), handle (4-10 inches), hilt (optional, 1-2 inches), and blade (12-48 inches).
- Securely tape coins to both ends of the pipe to prevent the pipe from cutting through the foam.
- Rough up the pipe with sandpaper, if you have it. The glue will stick better to a rougher surface.
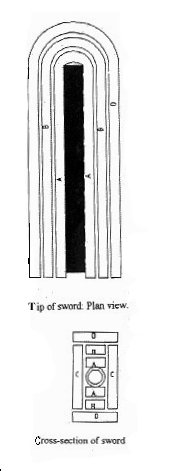
- Cut two long narrow strips of closed cell foam to the width equal to the diameter of the pipe. The strips should be long enough to go up one side, around the top, and down the other side (pieces A & B in the diagram to the right). These strips do not have to be continuous, but any breaks in the foam should not be near to tip or middle of the blade.
- Glue continuously the first strip (piece A) from where the blade begins up over the tip and back down the opposite side. These are the striking edges of the sword.
- For best results with the glue, make sure both surfaces are clean and dry. Apply a thin layer of glue evenly over the entire surface. If you have time, apply glue to both sides and let it dry a minute or so until both surfaces are "tacky", then firmly press the pieces together.
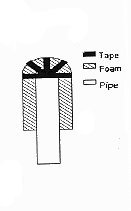
- Attach the foam at the tip of the sword to the PVC pipe with narrow pieces of duct tape as seen in the diagram (a piece of duct tape ripped lengthwise into 4 pieces works well). The best way to do this is to lay the center of the strip of duct tape on the foam and then bring the tape down along the sides. Do not compress the foam as you tape.
- Secure the bottom if the foam strip to the pipe with small strips of duct tape.
- Glue the second strip of foam (piece B) to the first one, repeating steps 5-8.
- Cut out two pieces of close-cell foam that are long enough the cover the sides of the sword (the "flat" of the blade) from base to tip (piece C). The easiest way to do this is to trace the side of the blade on the foam and cut it out.
- Glue these pieces to both sides of the blade, covering the pipe and the layers of foam.
- Cut out a piece of foam that is long enough to extend up and over the tip of the weapon and back down the base (piece D). The width should equal the diameter of the pipe plus two ˝ inch pieces of foam.
- Glue this strip of foam to the striking edge of the blade, covering both of the sidepieces (piece C).
- Secure the bottom of the sidepieces of foam (piece C) to the pipe with 2 small pieces of duct tape (strip 1). Then wrap a small piece of duct tape around the very bottom of the blade (strip 2), and another small piece around the pipe right under the blade (strip 3).
HANDLE CONSTRUCTION
The Hilt (optional)
- Trace out the shape you want for the hand guard/hilt on a sheet of closed-cell foam and cut out at least 2-3 identical pieces. The thicker the crossbar, the less likely it is to tear apart. If you don’t care what kind of hilt you have, use the stencil attached to the instructions.
- Glue and tape these 2-3 pieces together.
- Cut a hole equal to the diameter of the pipe through the center of the hilt piece.
- Slide the hilt piece onto the pipe and glue it tightly in place just under the blade.
- Tape the hilt to both the pipe AND the blade. Just glue alone won’t be enough to hold the hilt in place! Use AT LEAST three layers of duct tape on all four sides where the hilt & blade or hilt & pipe meet. It is best to use small, measured pieces of tape to keep the weight down and avoid the hilt looking bulky or messy.
- Finally, cover the hilt in duct tape. No foam should be showing.
Counterweights (optional)
- Hold the sword by the handle as you would in combat. Using a pen or pencil, make a dot on the pipe right between your middle and ring fingers. This is the balance point of the weapon.
- Using a pocketknife, drill a small hole into the pipe where the dot is.
- Drive in the screw through the hole. It should fit snugly. If the head of the screw sticks out too much, you can cut it off with a hacksaw.
- Stack a column of pennies to a height equal to the remaining length of pipe under the screw. Using two thin pieces of duct tape, tape the penny roll lengthwise to hold it together.
- Put a little glue inside the pipe. Then stick the penny roll inside the pipe. It will be a tight fit, and you may have to ram or hammer the roll of pennies down it. Finally, cover the end of the pipe with 2-3 pieces of duct tape to keep the pennies inside.
The Pommel
- The pommel (the butt end of the handle) must be well padded. The following instructions are for a quick and easy cylinder-shaped pommel.
- Cut out a small circle out of foam the same diameter as the pipe and glue and tape it to the tip of the handle.
- Cut a piece of closed-cell foam 2 inches wide and long enough to wrap around the pipe. Wrap this piece of foam around the end of the handle (including the little foam circle taped to the end) and glue and tape it in place.
- Cut a second circle out of close-cell foam that is equal to the diameter of the pipe and foam at the end of the pommel. Glue it on the end of the pommel.
- Cut out a second piece of close cell foam 2˝ inches wide and long enough to wrap around the pipe and foam at the end of the pipe. Glue and tape this piece around the first piece of foam, including the second foam circle glued to the end. You must not be able to feel the pipe through the end of the foam.
- Tape the pommel to the pipe. Just glue alone won’t be enough to hold the pommel in place! Use AT LEAST three layers of duct tape all around where the pipe and pommel meet. It is best to use small, measured pieces of tape to avoid the pommel looking bulky or messy.
- Finally, cover the pommel in duct tape. No foam should be showing.
The Grip
- Firmly tape one end of whatever material you’re using to cover the grip (rope, leather, etc.) to the pipe right under the hilt.
- Cover the remaining pipe with a thin layer of glue.
- Wrap the grip material as tightly as possible around the pipe all the way down to the pommel. If you do not wrap the material tightly, it will begin to fall off within a month.
- Securely tape the other end of the grip material to the pommel.
HILT STENCIL